This guide steps you through the process of adding plugins to your project as a Project Plugin rather than having them installed in the Unreal Engine folder.
This is desirable for a few different reasons:
- You want to install a plugin from source, like downloading from GitHub or a ZIP file.
- You want to install the plugin for a different version than what's supported on the Marketplace (i.e. UE5, or an older version).
- Do note that the plugin may not support that engine version since Epic changes APIs/etc. from version to version. It'll work most of the time, but you may have to deal with compiler errors.
- You want to commit/check-in your plugin to source control for others on your team to use.
- You want to edit the functionality/code of a plugin.
- You want to ensure your project is using a specific version of the plugin.
This guide is split into the main parts:
- Definitions - some predefined terms we use throughout the guide
- Requirements
- Convert Your Project to a C++ [and Blueprint] Project (you must do this, but you only have to do it once per project)
- Acquiring the Plugin Contents
- Installing Plugin as a Project Plugin
¶ Definitions
Below are some common phrases that we'll be using within this guide.
Project File: This is your ProjectName.uproject file.
Project Directory/Folder/Dir: This is the directory/folder where your projects ProjectName.uproject file is located.
¶ Requirements
Since plugins are written in C++, you'll need Visual Studio to be able to compile the plugins that are in your project folder. It doesn't matter if they're precompiled or not, because you'll also need to Convert your Project to a C++ Project anyway to use project-based plugins.
Below is a table of which Visual Studio version you'll need based on the engine version of your project (acquired from Epic's official table). I recommend always getting the correct version of Visual Studio, even though you may “get away” with a different version. This ensures you're working with the same compiler version that the author and Epic are using for that engine version.
| Unreal Engine Version | Visual Studio Version |
| 5.3 | VS 2022 (Default, 17.4 or later, 17.6 recommended) / VS 2019 (16.11.5 or later) |
| 5.2 | VS 2022 (Default, 17.4 or later) / VS 2019 (16.11.5 or later) |
| 5.1 | VS 2019 (Default, 16.11.5 or later) / VS 2022 (17.4 or later) |
| 4.25 to 5.0 | VS 2019 |
| 4.22-4.24 | VS 2017 / VS 2019 |
| 4.15-4.22 | VS 2017 |
| 4.10-4.14 | VS 2015 |
| 4.02-4.09 | VS 2013 |
You can find downloads for Visual Studio here, including the Community edition, which is perpetually free.
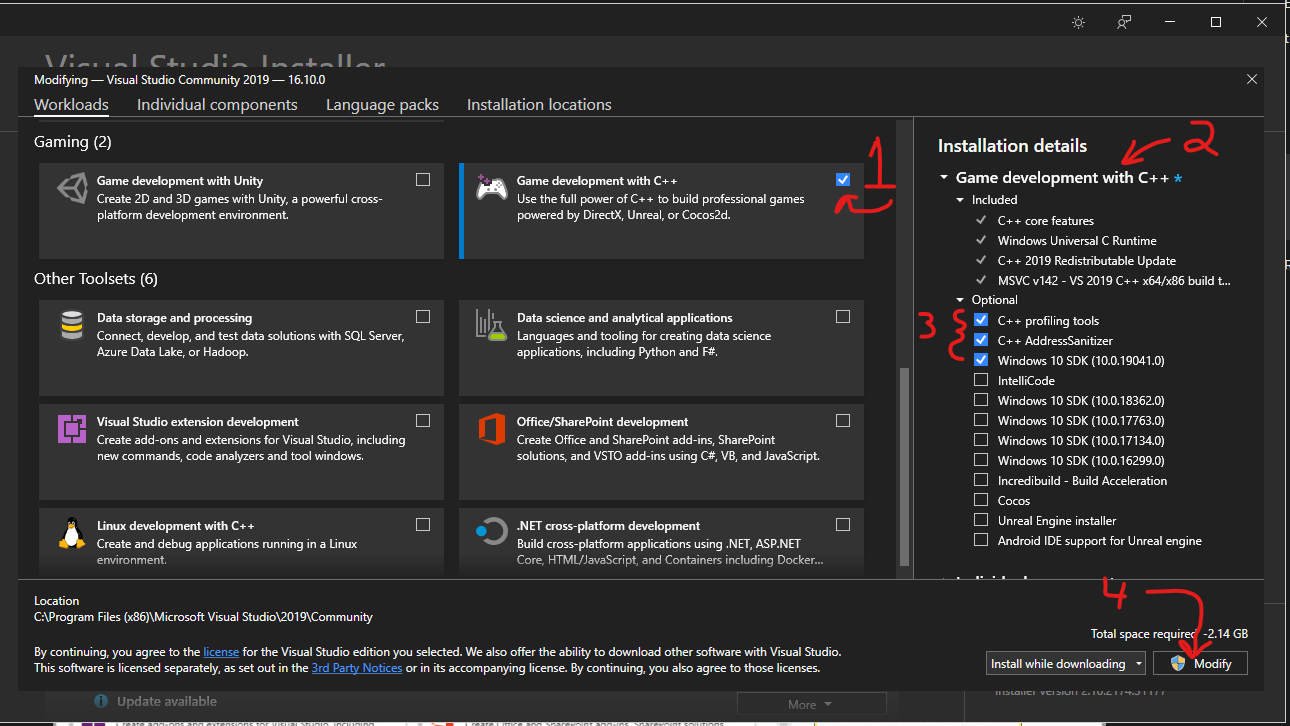
During installation, you'll be prompted with various extras to install. You'll want to select Game development with C++ as well as these additional options under the optional settings on the side panel:
- C++ profiling tools
- C++ Address Sanitizer (optional)
- Windows 10 SDK (10.0.18362 or Newer)
The image below outlines the different options you'll need. Do note that Unreal Engine installer is not necessary for this guide. The image also shows me modifying the installation, so the button at the bottom right is Modify instead of Install.
If you missed this window during installation, you can get back to it by running the Visual Studio Installer application from the Windows Start Menu, and clicking Modify next to the version you're using.
¶ Convert Your Project to a C++ [and Blueprint] Project
You only need to do this once per project, and you only need to do it if you selected Blueprints in the project creation wizard.
Don't worry, you don't have to code any C++, convert any of your Blueprints to C++, or damage any part of your project.
This is just a necessary step for Unreal to be able to manage, compile, and load the plugins.
¶ Do I need to do this?
You can quickly check if your project is already a C++ project in two places. You should verify both.
- Your Project File has a section in it like the below. Having more is okay; we're just looking for one here.
"Modules": [
  {
    "Name": "ProjectName",
    ...
  }
]
- Your Project Directory has the Source folder in it, and there is at least a
ProjectName.Target.csfile in the Source folder. There will be more files and folders in Source, but these are just some quick indicators to look for.
If both of those look good, then your project is already a C++ project! You can skip the step to convert your project and go to Acquiring the Plugin Contents.
¶ Create a C++ Class
Converting your Blueprint-only Project to a C++ [and Blueprint] Project is as easy as creating a C++ class!
- Open the New C++ Class wizard.
- UE4
- Click on the main Level Editor tab in the editor (where you place actors in the world)
- Click File in the top menu bar
- Click New C++ Class…
- UE5
- Click Tools in the top menu bar
- Click New C++ Class…
- UE4
- A window will popup asking you to Choose Parent Class. Any class will do. I usually select None (An empty C++ class with a default constructor and destructor).
- If you don't see None, then ensure one of the below:
- UE4: Make sure Show All Classes in the top right of the popup is unchecked. See the below image for a reference.
- UE5: Make sure you have the Common Classes tab near the top selected. See the below image for a reference.
- If you don't see None, then ensure one of the below:

3. After selecting the parent class, click the Next button.
4. Select the class settings.
- I usually like to change the Name to something more specific than the default MyClass. I usually enter EmptyClass for the name to let me know that the class is meant to be empty.
- I do not click Public or Private usually. If you click these by accident, you can just delete the “Public/” or “Private/" at the end of the Path.
- I leave the rest of the default settings as is.
5. Click Create Class.
6. Wait for it to finish.
7. Great, you now have a C++ [and Blueprint] Project! You don't have to do this again for this project. You can move onto installing the plugin as a Project Plugin.
¶ Acquiring the Plugin Contents
Before we can install the plugin to the project, we have to get the plugin source/contents. Below we go over different methods plugins use to distribute their contents.
¶ GitHub
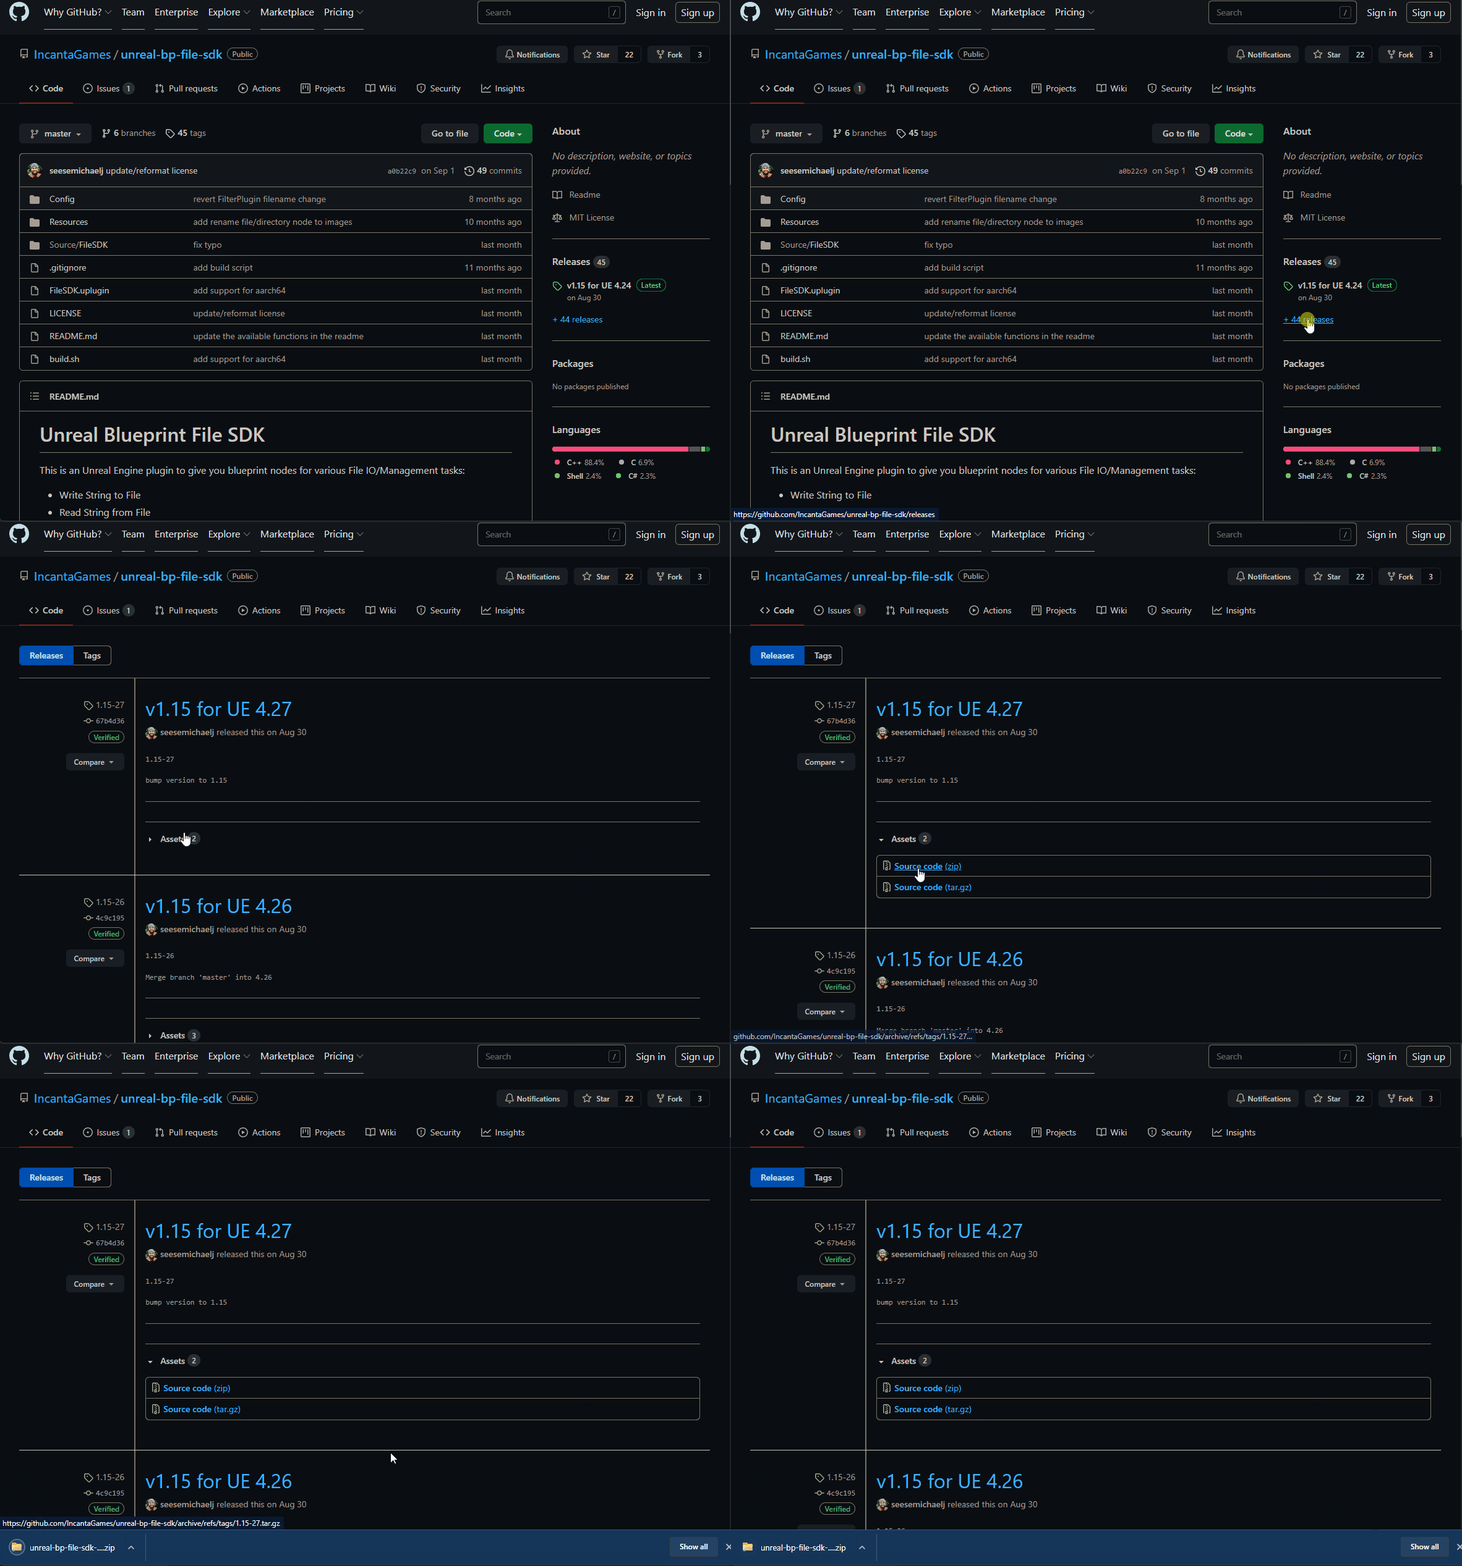
Depending on the author of the plugin, there are usually multiple methods of acquiring the source. Below are some GIFs showing how you can download the source.
Some plugins use the built-in Releases functionality within GitHub to version/distribute code. This is the first place I look to get stable versions.
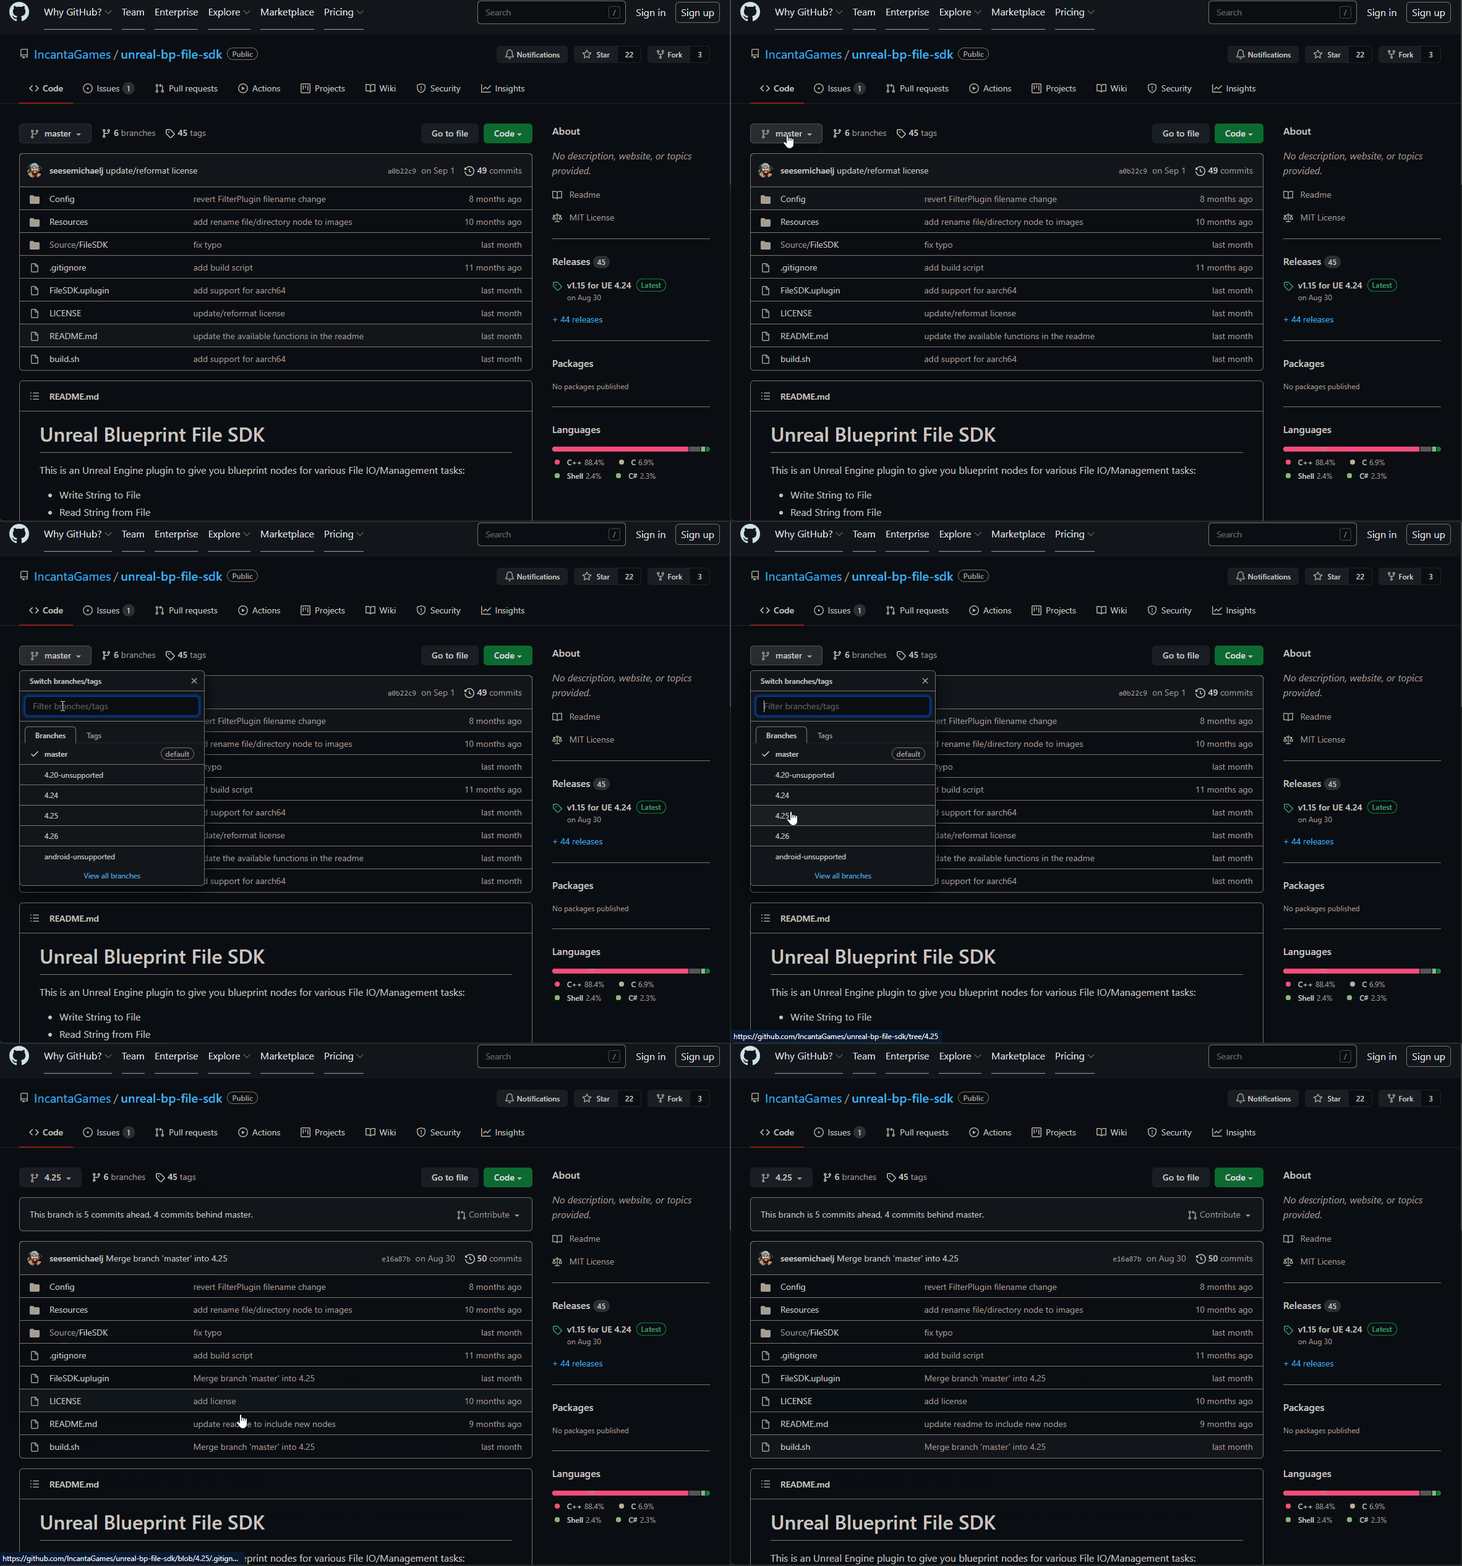
If the plugin doesn't use Releases, you can acquire the code directly from the repo. But first, make sure you select the appropriate branch. Below is an example of me switching to a 4.25 branch that the author setup. Not all plugins have these separate branches; it's best to reach out to the plugin author to determine what is right for you.
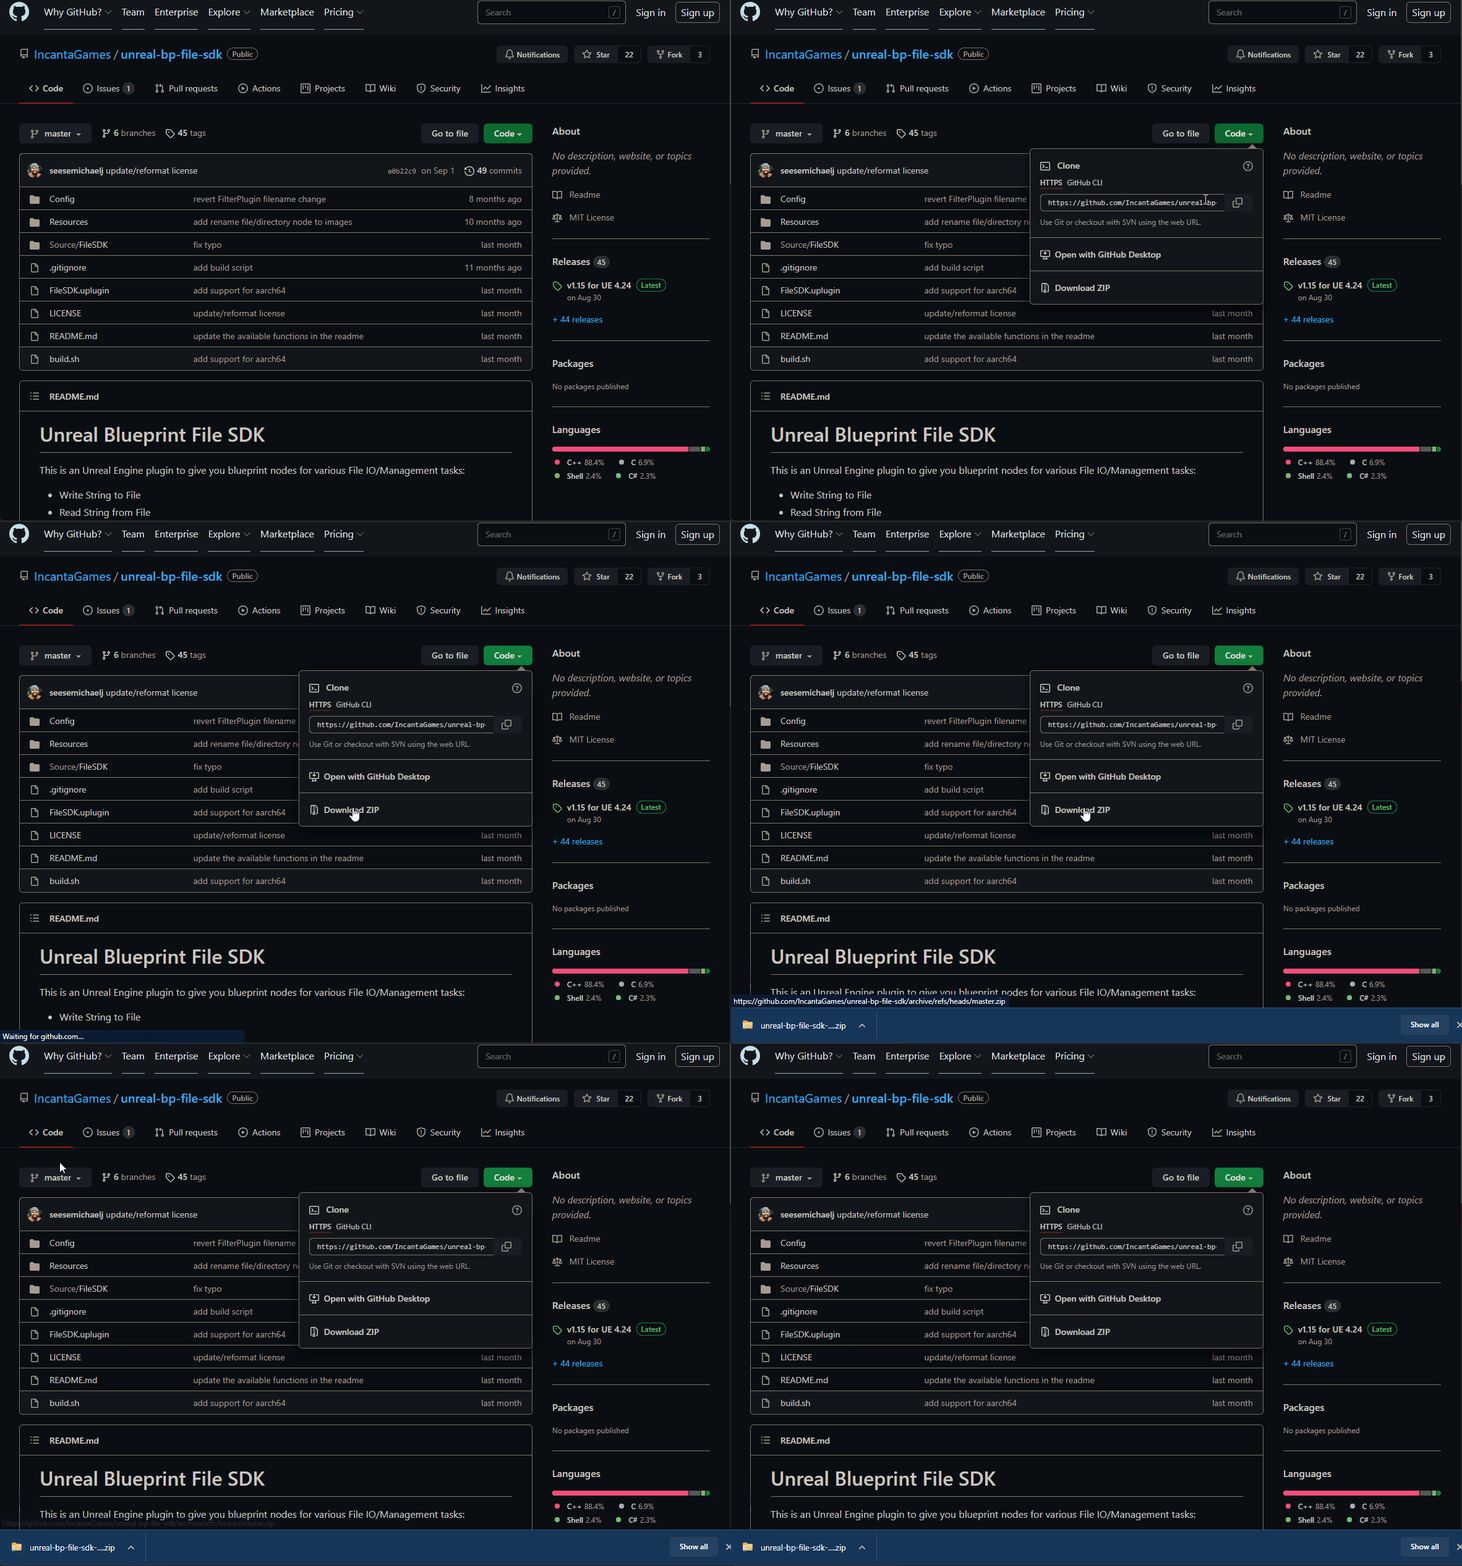
Once you're on the correct branch, you can download a ZIP file of that branch's contents; below is a GIF demonstrating that.
¶ GitLab
Depending on the author of the plugin, there are usually multiple methods of acquiring the source. Below are some GIFs showing how you can download the source.
Some plugins use the built-in Releases functionality within GitLab to version/distribute code. This is the first place I look to get stable versions.
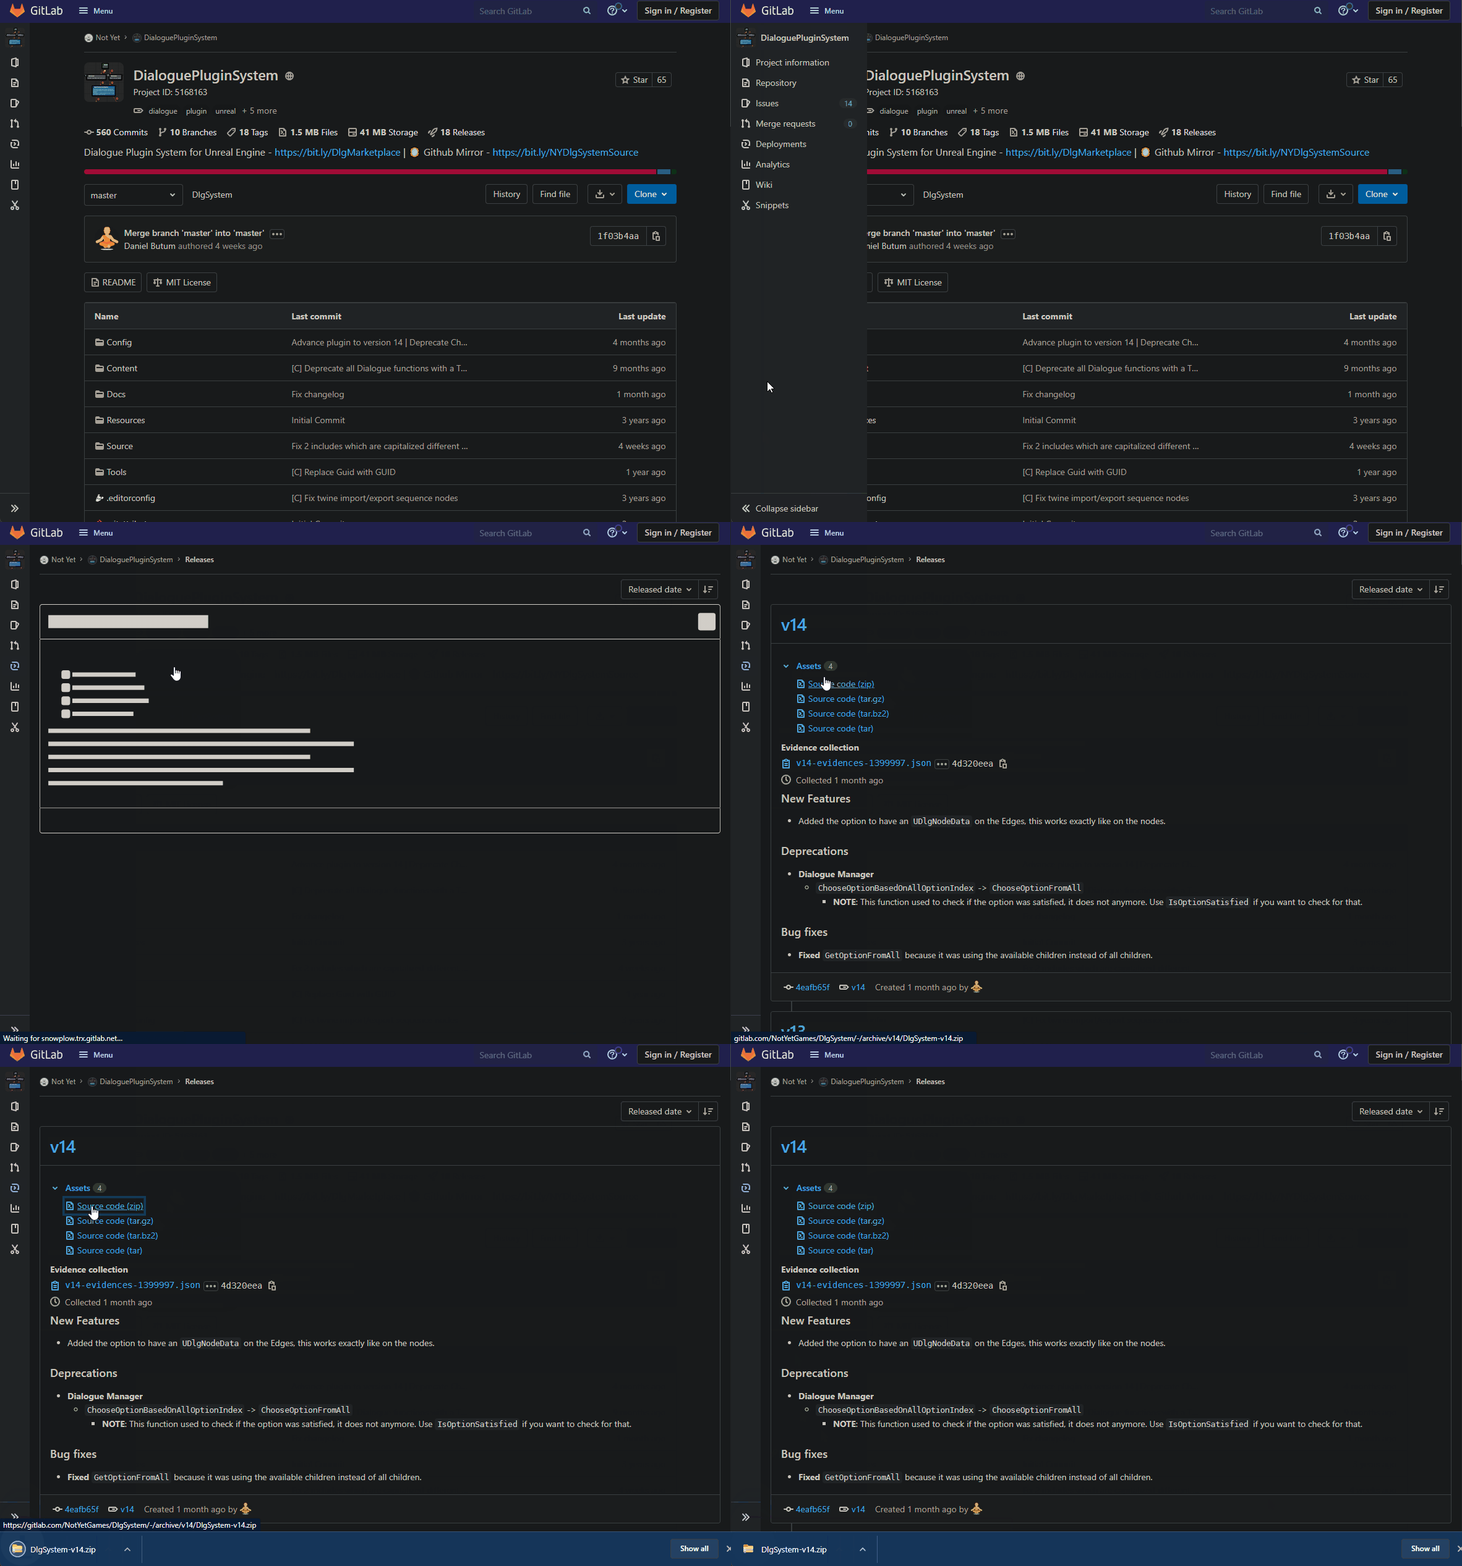
If the plugin doesn't use Releases, you can acquire the code directly from the repo. But first, make sure you select the appropriate branch. Below is an example of me switching to a 4.23 branch that the author setup. Not all plugins have these separate branches; it's best to reach out to the plugin author to determine what is right for you.
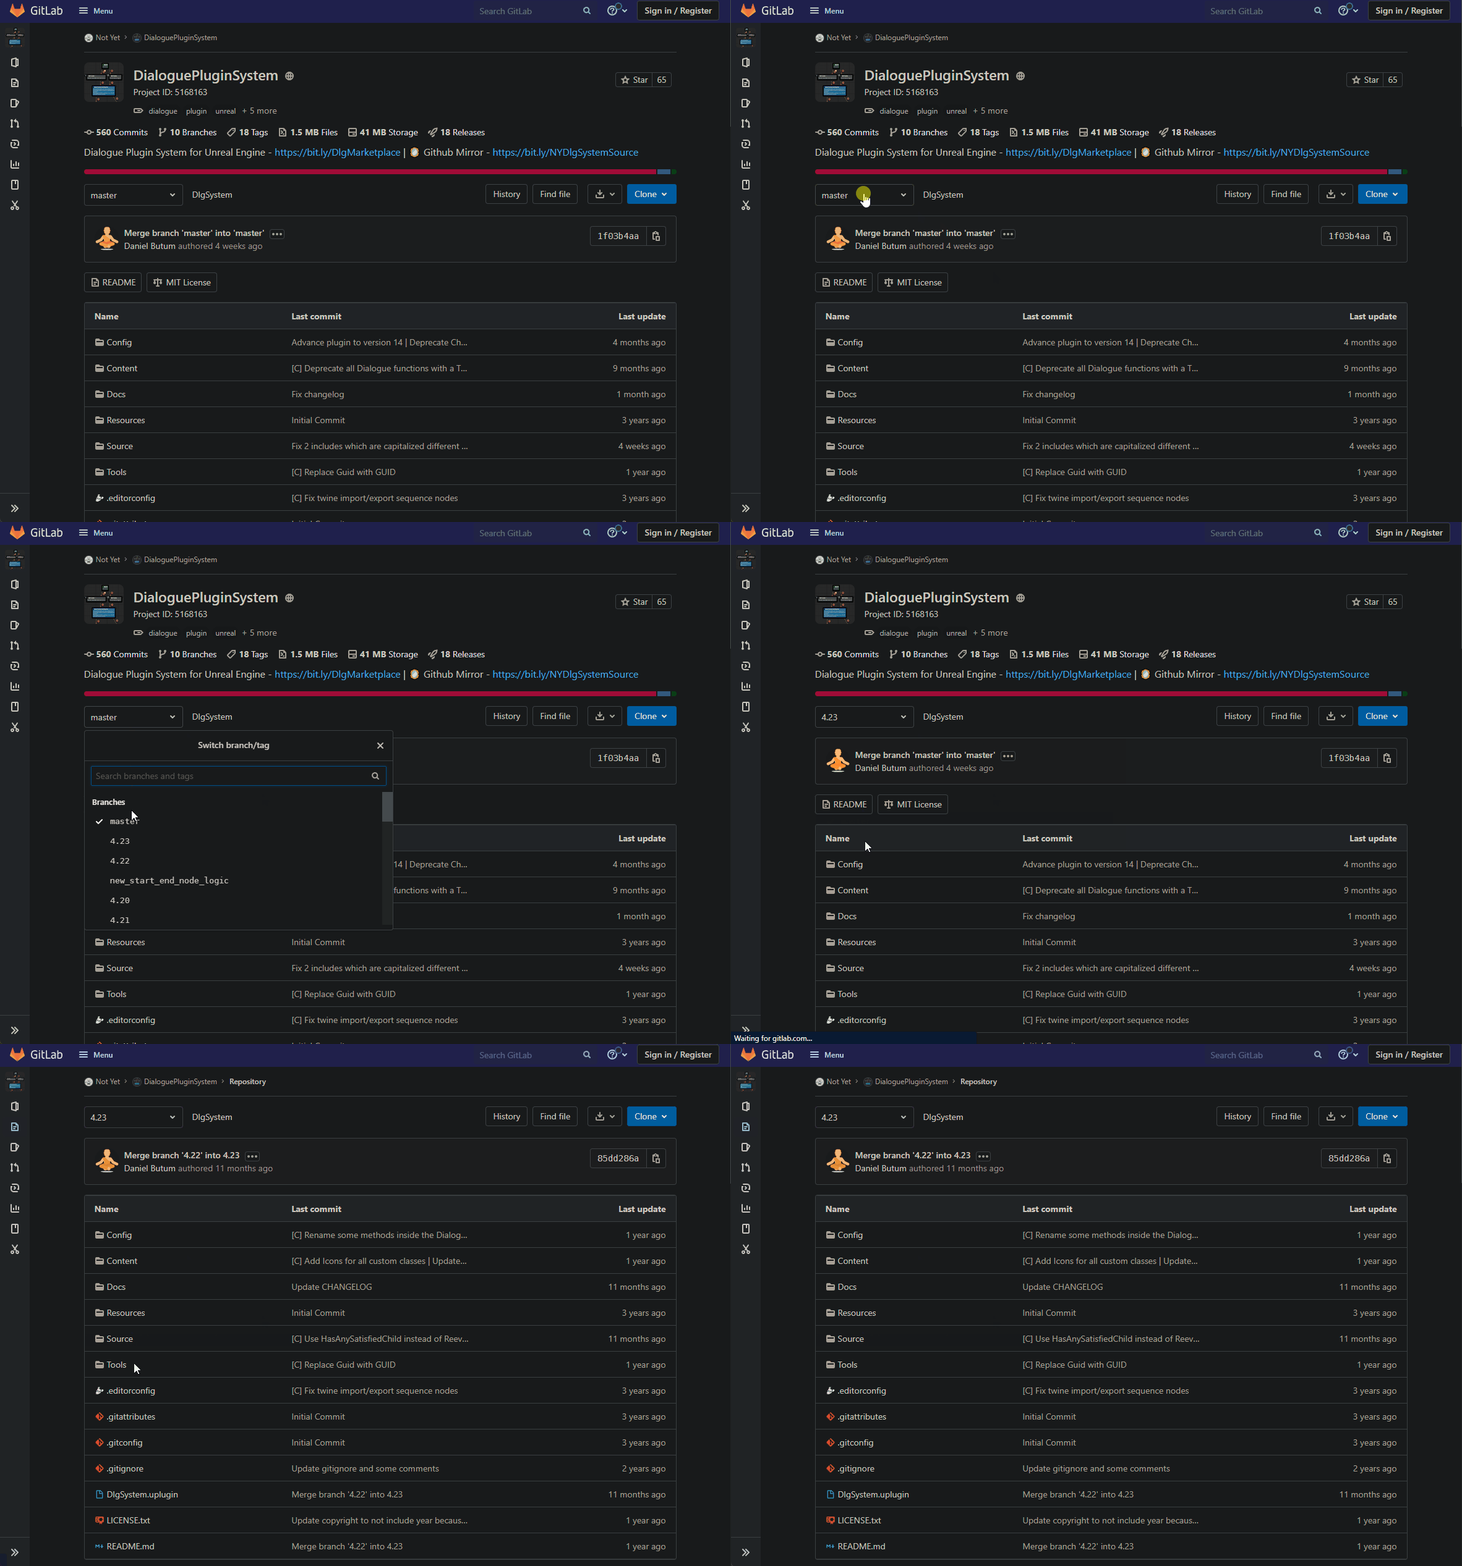
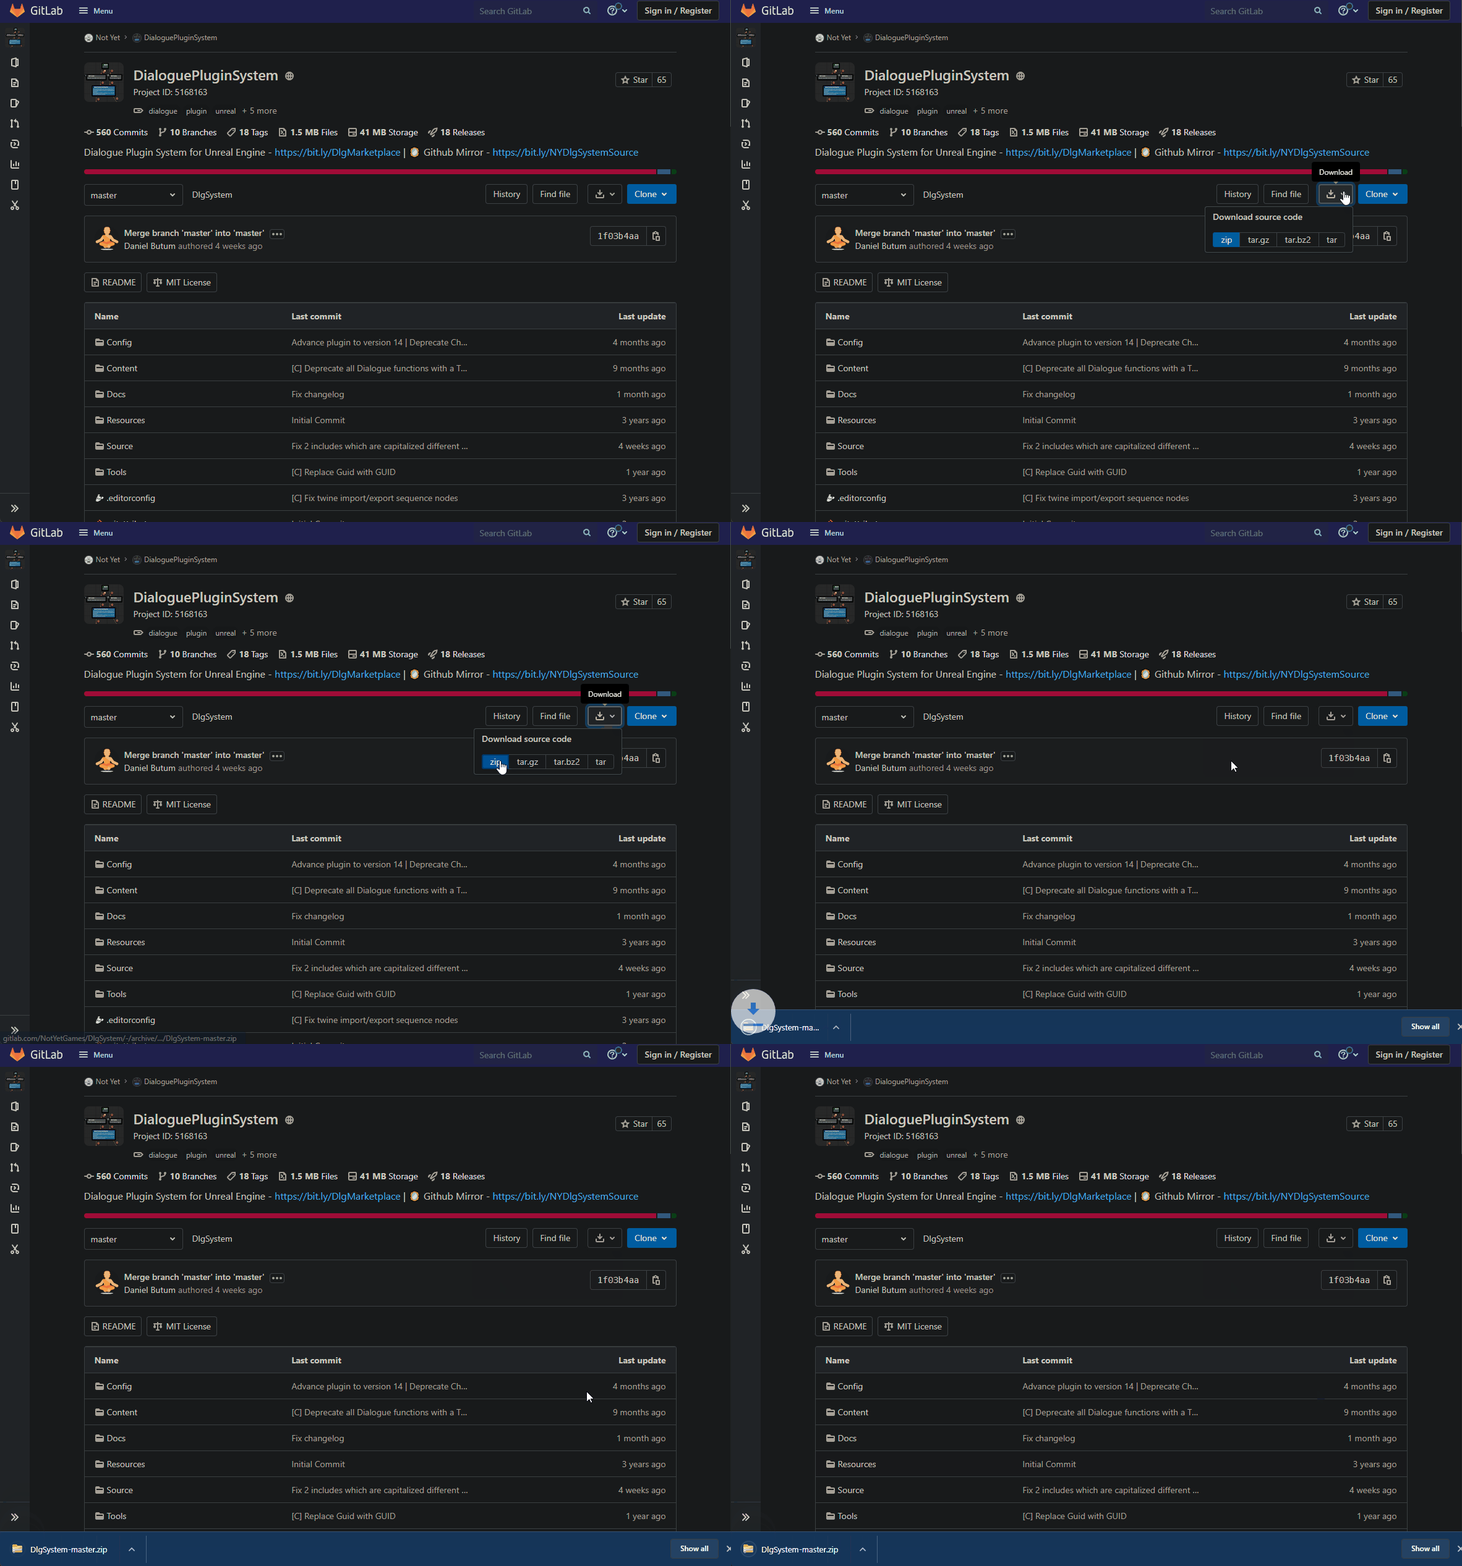
Once you're on the correct branch, you can download a ZIP file of that branch's contents; below is a GIF demonstrating that.
¶ Unreal Marketplace / Epic Games Launcher
Most plugins are distributed via purchase/free on the Unreal Marketplace and downloaded using the Epic Games Launcher. Whether you're using this step to acquire a plugin for UE5 Early Access (since Epic doesn't distribute UE5 content via the launcher yet), or you're just looking to take an existing engine plugin and put it into your project, we'll guide you through the various steps.
¶ Installing the Plugin to the Engine
To be able to download a plugin, you must have a compatible version of the engine installed for that plugin. You can see the compatible versions on the plugin's Marketplace page:
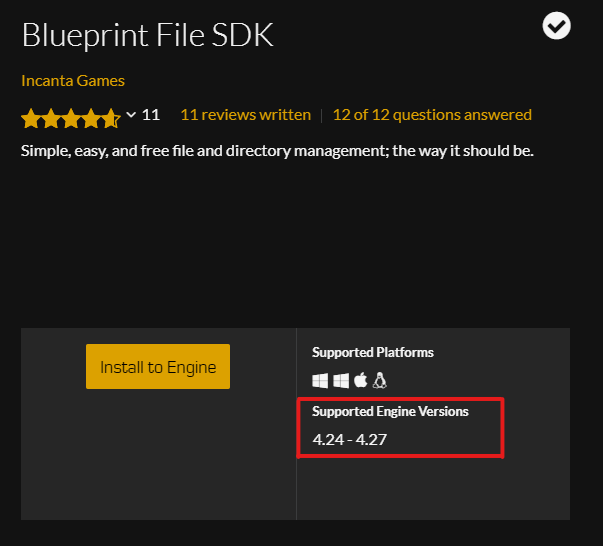
If you're downloading a plugin that says it supports UE5 EA in the description, make sure you read the description fully to understand the correct install procedure. If none is provided, you likely can download the plugin for the latest engine version it supports (i.e. 4.27).
Once you have the correct engine version installed, the plugin is purchased on the marketplace, open the Epic Games Launcher desktop application (only available on Windows and Mac; there isn't a known good/stable solution for Linux yet), find, and install the plugin to that engine version. If you can't find plugin, try force/completely exiting the Epic Games Launcher program (using the Exit option in the tray menu) and reopening it; sometimes it takes a little bit of time for it to show up if you just recently purchased the plugin. The below GIF shows the install process. Note the plugin I'm installing only shows 4.24 because it is already installed on 4.25-27. In other words, if you see that the plugin supports your engine version, but you don't see the version in the drop down of the install popup, it's already installed for that engine version.
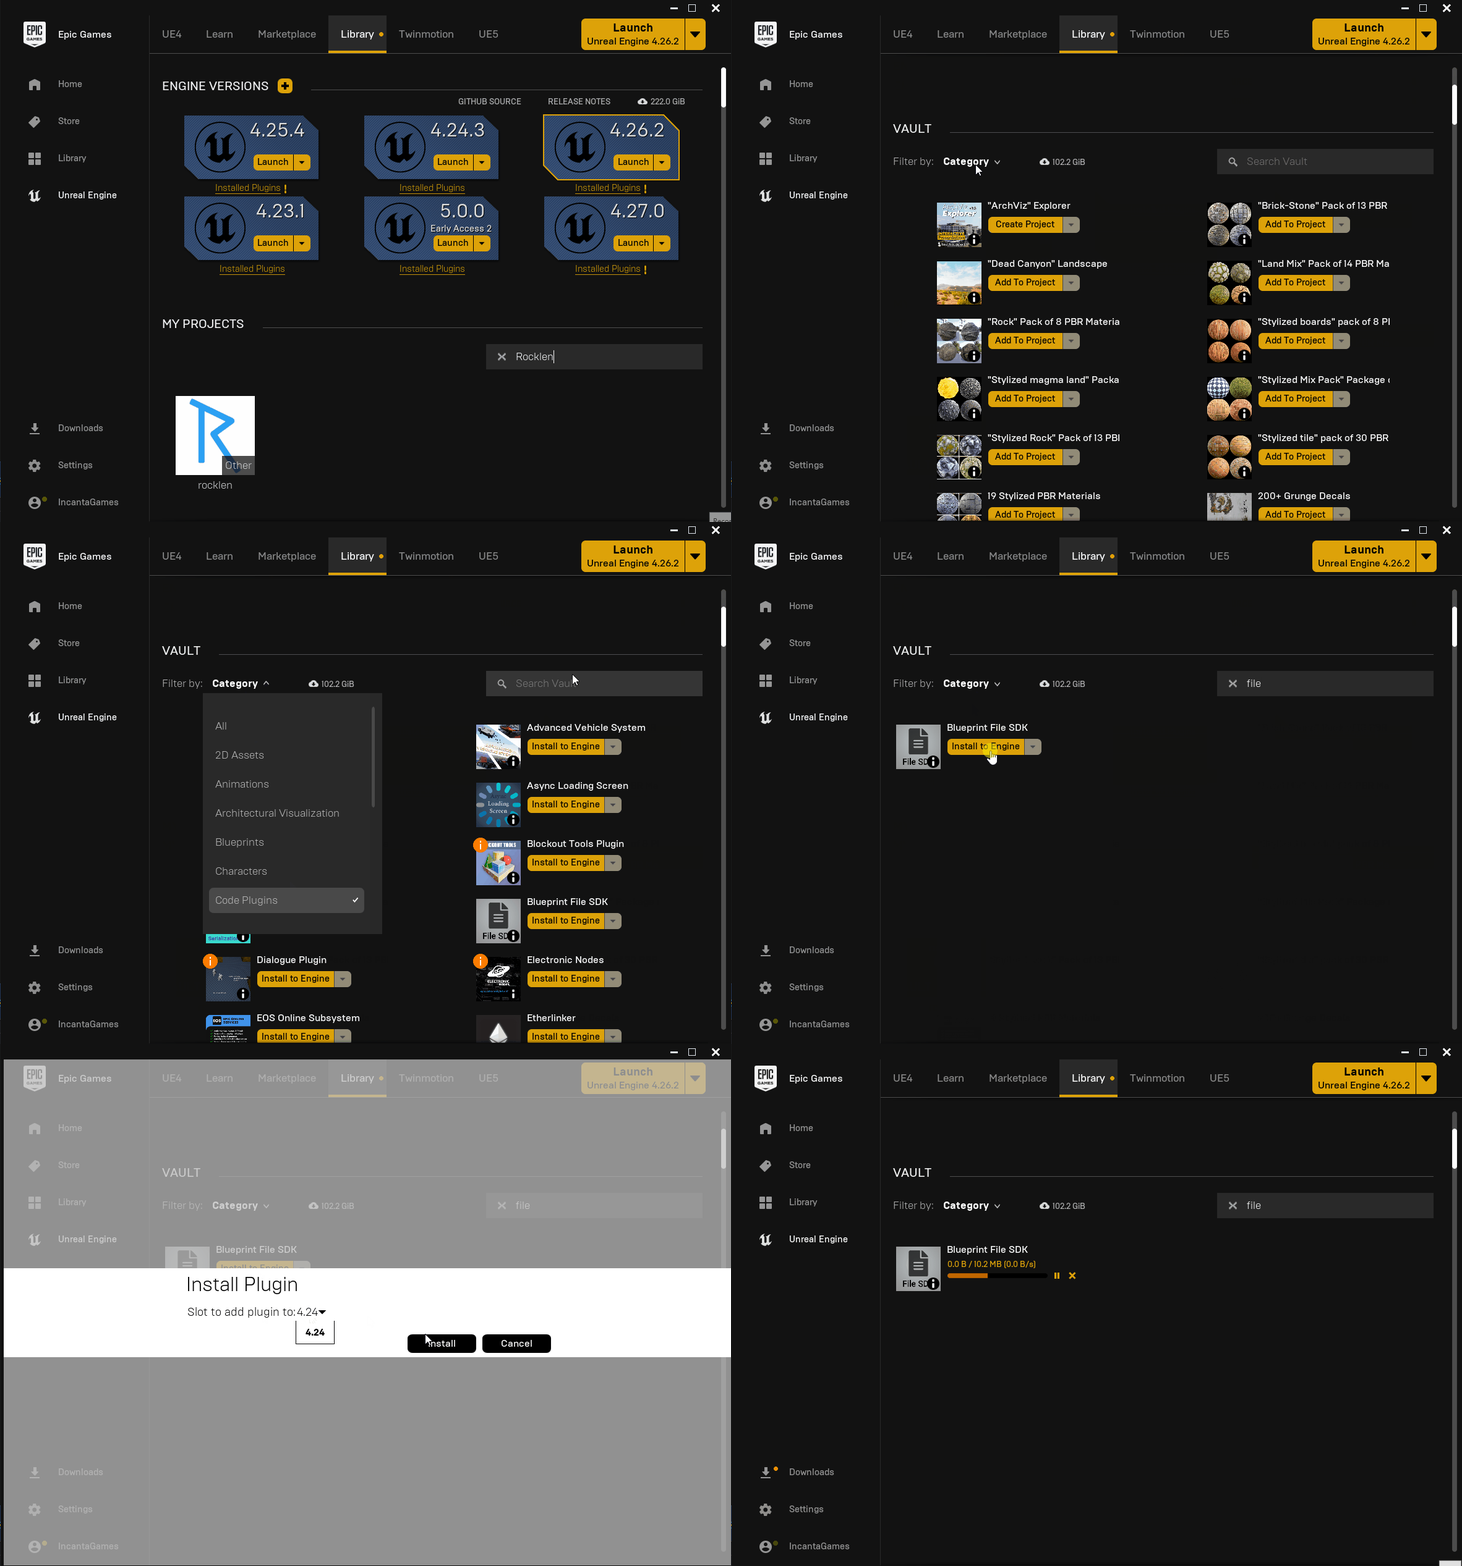
Once it has finished downloading and installing the plugin you can find it where your Unreal Engine is installed. By default this is at C:\Program Files\Epic Games\UE_4.27 where the last folder is the specific engine version. We'll refer to this path as EngineDir going forward.
Once you've located your EngineDir folder, you can find the plugin you just installed in EngineDir\Engine\Plugins\Marketplace. The folder doesn't always match the name in the launcher, so you'll have to do some deduction to figure it out. For example, the plugin we installed in the above GIF installed to C:\Program Files\Epic Games\UE_4.24\Engine\Plugins\Marketplace\FileSDK.
You can take this folder and copy and paste it to another location, or just keep it readily available to copy/paste in the below installation steps.
¶ Installing Plugin as a Project Plugin
- Go ahead and make sure your project/Unreal Editor is closed.
- If your plugin was acquired via a ZIP file or some other archive (.rar, .7z, .tar, .tgz. tar.gz, etc), you'll need to extract the contents of that archive to a folder.
- Create the
Pluginsfolder in your ProjectDir if it doesn't already exist (i.e.ProjectDir\Plugins) - Copy/cut and paste the plugin contents folder (i.e. whatever you extracted in step 2 or the engine plugin directory [i.e.
C:\Program Files\Epic Games\UE_4.24\Engine\Plugins\Marketplace\FileSDK]) and paste it intoProjectDir\Plugins. In our running example, we would haveProjectDir\Plugins\FileSDK\FileSDK.uplugin.- While it doesn't matter, I personally like to get rid of extra folders created by the extraction process if I'm extracting the plugin like in step 2. Sometimes you'll get something like
FileSDK\FileSDK\FileSDK.uplugin. In this case, I would just copy/cut the secondFileSDKfolder so I end up withProjectDir\Plugins\FileSDK\FileSDK.uplugin.- However, both
ProjectDir\Plugins\FileSDK\FileSDK.upluginandProjectDir\Plugins\FileSDK\FileSDK\FileSDK.upluginare valid Project Plugin installations. This is purely up to you.
- However, both
- While it doesn't matter, I personally like to get rid of extra folders created by the extraction process if I'm extracting the plugin like in step 2. Sometimes you'll get something like
- If the plugin you downloaded for was originally meant for another engine version (i.e. UE4 when you're trying to install to a UE5 project), you will need to change the EngineVersion.
- Open the plugin descriptor file under your project plugin (i.e.
ProjectDir\Plugins\PluginName\PluginName.uplugin). - Find the line that says
"EngineVersion": "4.27.0"(or similar), and change it to the version of your project (i.e."EngineVersion": "5.0.0"). - Save the file.
- You can skip this step if your plugin naturally supports the engine version of your project, but you'll get a warning every time you open the project.
- Open the plugin descriptor file under your project plugin (i.e.
- Open your project with the Unreal Editor (either by double clicking your ProjectFile or by opening via the Epic Games Launcher).
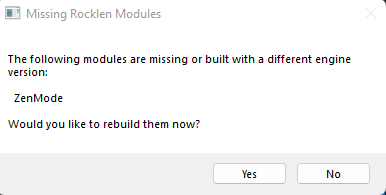
- You'll likely get a warning stating The following modules are missing or built with a different engine version…Would you like to rebuild them now? Click Yes. See the below image as a reference
8. If it says you have issues compiling the plugin or if you need to compile the project manually, contact the plugin author for more help.
9. Your project should now have loaded. You can check/ensure that your plugin is loaded by going to Edit > Plugins, searching for it, and ensuring it's enabled.